Blog - Crusader Beats - Page 3

EastWest Symphonic Orchestra VSTi – A Powerful Tool for Cinematic Music Production

Creating realistic orchestral music no longer requires access to a full symphony orchestra. Thanks to modern virtual instruments, composers can produce professional-quality orchestral scores directly from their home studios. One of the most well-known tools in this field is EastWest Symphonic Orchestra, a powerful VSTi designed for film, game, and classical music production.

In this article, we’ll take a closer look at what EastWest Symphonic Orchestra offers, how it works, and who it’s best suited for.


What Is EastWest Symphonic Orchestra?

EastWest Symphonic Orchestra is a comprehensive orchestral virtual instrument developed by EastWest Sounds. It provides detailed samples of a full symphony orchestra, recorded with high-end equipment in a professional concert hall.

The library is hosted in the PLAY engine, EastWest’s proprietary sampler and playback system, available as a VST, AU, and AAX plugin.


What’s Included in the Library?

EastWest Symphonic Orchestra covers all major orchestral sections:

Strings

  • Violins (first and second)

  • Violas

  • Cellos

  • Double basses

Brass

  • Trumpets

  • French horns

  • Trombones

  • Tuba

Woodwinds

  • Flutes

  • Oboes

  • Clarinets

  • Bassoons

Percussion

  • Timpani

  • Orchestral drums

  • Cymbals and mallet instruments

Each instrument includes multiple articulations such as sustains, staccatos, pizzicato, tremolo, and more.


Sound Quality and Recording

One of the strongest points of EastWest Symphonic Orchestra is its realistic and cinematic sound.

Key highlights:

  • Recorded in a large concert hall

  • Multiple microphone positions

  • Natural ambience and depth

  • Warm, full orchestral tone

This makes the library especially suitable for epic film scores and lush symphonic arrangements.
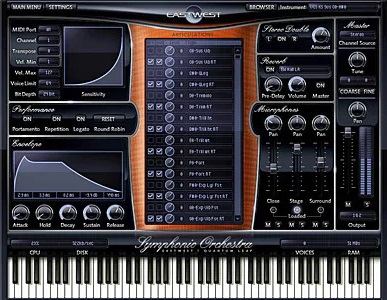

The PLAY Engine

The PLAY engine allows users to control articulations, dynamics, and microphone positions directly inside the plugin.

Features include:

  • Articulation switching via keyswitches

  • Built-in convolution reverb

  • Mic mixing for depth control

  • Performance-optimized playback

While the interface is powerful, it may feel complex for complete beginners at first.


Performance and System Requirements

Due to its detailed sampling, EastWest Symphonic Orchestra is a resource-intensive instrument.

Things to consider:

  • Requires a fast CPU

  • Benefits greatly from SSD storage

  • Large RAM recommended for full templates

For best results, a modern production system is advised.


Best Use Cases

EastWest Symphonic Orchestra is ideal for:

  • Film and TV scoring

  • Video game soundtracks

  • Classical mockups

  • Epic and cinematic music

  • Hybrid orchestral productions

It’s often chosen by composers looking for a bold, dramatic orchestral sound.


Pros and Cons

Pros:

  • High-quality, cinematic sound

  • Complete orchestral coverage

  • Multiple mic positions

  • Trusted industry reputation

Cons:

  • Large library size

  • Demanding on system resources

  • Less dry than some modern libraries

  • PLAY engine learning curve


EastWest vs Other Orchestral Libraries

Compared to libraries like Spitfire Audio or Vienna Symphonic Library:

  • EastWest offers a more pre-orchestrated, cinematic sound

  • Less focused on ultra-dry recordings

  • Faster to achieve big, epic results

Many composers use EastWest alongside other orchestral tools.


EastWest Symphonic Orchestra VSTi remains a powerful and respected orchestral library, especially for composers working in cinematic and epic styles. Its rich sound, extensive articulations, and professional recording quality make it a strong choice for anyone serious about orchestral music production.

While it may require a solid system and some learning time, the results can be truly impressive.

The Most Common Mistakes Beginner Music Producers Make (And How to Avoid Them)

Starting out in music production is exciting, but it can also be overwhelming. With endless tutorials, plugins, and advice available online, beginners often fall into the same traps that slow down progress and affect sound quality.

In this article, we’ll explore the most common mistakes beginner producers make and show you how to avoid them so you can grow faster and more confidently.


1. Using Too Many Plugins Instead of Learning the Basics

Many beginners believe that better plugins automatically mean better music.

The problem:

  • Installing dozens of synths and effects

  • Not fully understanding the tools already available

How to avoid it:

  • Learn one synth, one EQ, and one compressor well

  • Focus on fundamentals before expanding your plugin collection


2. Producing Without a Clear Goal

Starting a track without direction often leads to unfinished projects.

The problem:

  • Messy arrangements

  • No clear structure

  • Creative confusion

How to avoid it:

  • Define the genre and mood before you start

  • Use reference tracks

  • Plan a simple structure (intro, build, drop, outro)


3. Overusing Effects

Reverb, delay, distortion—everything sounds great until there’s too much of it.

The problem:

  • Muddy mixes

  • Loss of clarity

  • Reduced impact

How to avoid it:

  • Use effects with intention

  • Apply reverb and delay via sends

  • Frequently bypass effects to compare


4. Ignoring Gain Staging

Poor level management can ruin an otherwise good mix.

The problem:

  • Clipping and distortion

  • No headroom

  • Plugins behaving incorrectly

How to avoid it:

  • Keep individual tracks below 0 dBFS

  • Leave about -6 dB of headroom on the master

  • Control levels at every stage


5. Mixing in Solo Too Much

A sound may be perfect on its own but disappear in the mix.

The problem:

  • Decisions made without context

  • Frequency conflicts

How to avoid it:

  • Mix while listening to the whole track

  • Use solo only for quick problem detection

  • Focus on how elements work together


6. Not Using Reference Tracks

Mixing without references is like driving without a map.

The problem:

  • Unbalanced frequency spectrum

  • Inconsistent loudness

How to avoid it:

  • Use professional tracks as references

  • Compare balance, tone, and energy

  • Analyze rather than copy


7. Trying to Fix the Mix in Mastering

Mastering is not a magic fix.

The problem:

  • Over-limiting

  • Crushed dynamics

  • Weak foundations

How to avoid it:

  • Focus on making a solid mix first

  • Treat mastering as a separate process

  • Fix problems at the source


8. Not Taking Breaks (Ear Fatigue)

Tired ears lead to bad decisions.

The problem:

  • Harsh EQ boosts

  • Over-compression

  • Loss of objectivity

How to avoid it:

  • Take regular breaks

  • Revisit mixes the next day

  • Listen on different systems


9. Perfectionism Over Practice

Endless tweaking can kill creativity.

The problem:

  • Few finished tracks

  • Frustration

How to avoid it:

  • Finish tracks, even if they’re not perfect

  • Treat each project as a learning experience

  • Move forward instead of chasing perfection


10. Comparing Yourself to Professionals

Comparing your early work to polished releases is discouraging.

The problem:

  • Loss of motivation

  • Unrealistic expectations

How to avoid it:

  • Compare your progress to your past self

  • Celebrate small improvements

  • Remember: every professional was once a beginner


Mistakes are a natural part of learning music production. The key is recognizing them early and learning from them. Progress comes from consistency, patience, and focused practice—not from shortcuts.

Learn the fundamentals, finish your projects, and trust the process.

Reverb and Delay: When, How, and Why to Use Them

Reverb and delay are two of the most important effects in music production. They help create space, depth, and atmosphere—but when overused, they can quickly make a mix sound muddy or unfocused.

Understanding when, how, and why to use reverb and delay is essential for achieving professional-sounding mixes. In this article, we’ll break down both effects and explain how to use them intentionally.


What Is Reverb?

Reverb simulates the sound reflections that occur when audio interacts with a physical space—such as a room, hall, or cathedral.

In real life, sound bounces off surfaces and reaches our ears at slightly different times. Reverb recreates this behavior digitally.

Common Reverb Types

  • Room – small, natural spaces

  • Hall – large, spacious reverbs

  • Plate – smooth and musical, great for vocals

  • Spring – vintage, characterful sound

  • Ambient – subtle sense of space


Why Use Reverb?

Reverb is mainly used to:

  • Create a sense of space and realism

  • Place sounds in a mix (front vs. back)

  • Add depth and atmosphere

  • Glue elements together

Without reverb, many mixes sound dry and unnatural.


How to Use Reverb Effectively

Use Sends Instead of Inserts

Using reverb on an auxiliary/send channel:

  • Keeps the mix cleaner

  • Saves CPU

  • Creates a shared space for multiple tracks

Control Reverb with Pre-Delay

Pre-delay determines how long it takes before the reverb starts.

  • Short pre-delay → closer sound

  • Longer pre-delay → clearer, more upfront sound

EQ Your Reverb

Always EQ the reverb signal:

  • High-pass to remove low-end mud

  • Low-pass to tame harsh highs


What Is Delay?

Delay records a sound and plays it back after a set amount of time—creating an echo effect.

Unlike reverb, delay is rhythmic and time-based, often synced to the tempo of the song.

Common Delay Types

  • Slapback delay – short, single echo

  • Ping-pong delay – bouncing left/right echoes

  • Tape delay – warm, vintage character

  • Digital delay – clean and precise


Why Use Delay?

Delay is used to:

  • Add width and depth

  • Enhance rhythm and groove

  • Fill empty spaces

  • Create movement and interest

It’s often more noticeable than reverb and can be very musical.


How to Use Delay Creatively

Tempo Sync Is Key

Sync delay time to the track’s tempo (1/4, 1/8, dotted values) for rhythmic consistency.

Automate Delay

Use delay only on certain words or notes—especially on vocals or leads—to keep the mix clean.

Filter the Delay Signal

Filtered delays sit better in the mix and don’t clash with the original sound.


Reverb vs. Delay: When to Choose Which

  • Use reverb when you want realism and depth

  • Use delay when you want rhythm and movement

  • Use both carefully for spacious, emotional effects

Too much of either can push sounds too far back in the mix.


Common Mistakes to Avoid

– Too much reverb on every track
– Long reverb tails in busy mixes
– Delay masking vocals or leads
– Not EQing effects
– Using effects without purpose

Always listen in context.


A Practical Workflow Tip

  1. Start with the mix dry

  2. Add one main reverb for space

  3. Use delay for interest and rhythm

  4. EQ and automate effects

  5. Bypass often and compare

If you miss the effect when it’s off, you’re using it right.


Reverb and delay are not just effects—they are mixing tools that shape depth, space, and emotion. When used consciously, they enhance clarity and musicality. When overused, they hide problems instead of solving them.

Use reverb and delay with intention, subtlety, and purpose—and your mixes will instantly sound more professional.

Spectrasonics Omnisphere – The Ultimate Power Synth for Modern Music Production

When it comes to flagship virtual instruments, few names carry as much weight as Spectrasonics Omnisphere. Widely regarded as one of the most powerful and versatile synthesizers on the market, Omnisphere is more than just a synth—it’s a complete sound design ecosystem.

In this article, we’ll explore what makes Omnisphere so special, how it works, and who it’s best suited for.


What Is Omnisphere?

Omnisphere is a hybrid software synthesizer developed by Spectrasonics. It combines:

  • advanced synthesis engines

  • an enormous sample-based sound library

  • deep modulation and sound-design tools

Unlike traditional synths focused on a single synthesis method, Omnisphere blends sample playback, wavetable synthesis, granular processing, and virtual analog synthesis into one instrument.


The Sound Library – A World of Inspiration

One of Omnisphere’s biggest strengths is its massive sound library, which includes over 14,000 sounds.

What’s Inside

  • Pads and atmospheric textures

  • Cinematic soundscapes

  • Bass sounds and leads

  • Arpeggios and rhythmic sequences

  • Organic and experimental sounds

The library features both classic synth tones and highly creative, cinematic material recorded from real-world sources.


Hybrid Synthesis Engine

Each Omnisphere patch can use two layers, and each layer can be:

  • sample-based

  • wavetable-based

  • granular

This hybrid approach allows for incredibly complex and evolving sounds that would be difficult—or impossible—to create with a single synthesis method.


Advanced Modulation System

Omnisphere’s modulation system is deep yet intuitive.

Modulation Sources

  • LFOs

  • Envelopes

  • Modulation matrix

  • Performance controls

Almost any parameter can be modulated, allowing for subtle movement or dramatic transformations.


Built-In Effects and Processing

Omnisphere includes a powerful effects engine with over 50 high-quality effects, including:

  • Reverbs and delays

  • Distortion and saturation

  • Filters and modulation effects

  • Amp and cabinet models

Effects can be applied per layer, per patch, or globally—making Omnisphere a complete production environment on its own.


Hardware Synth Integration

A unique feature of Omnisphere is hardware synth integration. Many popular hardware synthesizers can be mapped directly to Omnisphere, allowing:

  • automatic parameter mapping

  • preset browsing from hardware

  • hybrid hardware/software workflows

This feature bridges the gap between physical and virtual instruments.


Performance and Preset Browsing

Despite its depth, Omnisphere is surprisingly playable.

Features include:

  • intelligent preset browser

  • sound categories and tags

  • performance macros

  • live-friendly controls

You can quickly find inspiration—or dive deep into sound design.


Best Use Cases

Omnisphere excels in many production scenarios:

  • Film and game scoring

  • Electronic and ambient music

  • Pop, hip-hop, and EDM

  • Experimental sound design

  • Layering and texture creation

It’s especially popular among composers who need rich, evolving sounds.


Pros and Cons

Pros:

  • Massive, high-quality sound library

  • Extremely deep sound design capabilities

  • Excellent preset management

  • Frequent updates and expansions

  • Strong industry reputation

Cons:

  • High price compared to standard synths

  • Large installation size

  • Can be overwhelming for beginners


Omnisphere vs Other Synths

Compared to synths like Serum, Massive X, or Vital:

  • Omnisphere focuses more on atmosphere, depth, and hybrid sound design

  • Less about aggressive EDM sound creation

Many producers use Omnisphere alongside more specialized synths.


Spectrasonics Omnisphere is not just a synthesizer—it’s a creative universe. While it may be overkill for simple tasks, its depth, sound quality, and flexibility make it one of the most respected instruments in modern music production.

If you’re looking for inspiration, cinematic textures, and limitless sound design potential, Omnisphere is a long-term investment that continues to deliver.

Equalizer Basics – How to Shape Your Sound

The equalizer, or EQ, is one of the most important tools in music production. While compression controls dynamics, EQ shapes the tone and clarity of your sound. Learning how to use an equalizer properly is essential for creating clean, balanced, and professional mixes.

In this article, we’ll cover EQ fundamentals and explain how to shape sound intentionally rather than guessing.


What Is an Equalizer?

An equalizer allows you to boost or cut specific frequency ranges within a sound. Every instrument occupies its own space in the frequency spectrum, and EQ helps prevent those sounds from clashing.

EQ does not fix bad recordings—but it can dramatically improve clarity and balance when used correctly.


The Frequency Spectrum Explained

Human hearing ranges roughly from 20 Hz to 20 kHz. For mixing purposes, this range is often divided into zones:

  • Sub-bass (20–60 Hz) – weight and rumble

  • Bass (60–250 Hz) – body and warmth

  • Low mids (250–500 Hz) – fullness, muddiness

  • Midrange (500 Hz–2 kHz) – definition and presence

  • High mids (2–6 kHz) – clarity, attack

  • High frequencies (6–20 kHz) – air and brightness

Understanding where instruments live in this spectrum is the foundation of effective EQ.


Cut Before You Boost

One of the most important EQ principles is:

Cut first, boost later (if at all).

Cutting unwanted frequencies:

  • Reduces muddiness

  • Preserves headroom

  • Sounds more natural

Boosting should be subtle and purposeful.


Types of EQ Bands

Most modern EQs offer several filter types:

High-Pass Filter (HPF)

Removes low frequencies below a set point.
Used to clean up rumble and low-end noise.

Low-Pass Filter (LPF)

Removes high frequencies above a set point.
Useful for taming harshness or fitting sounds into the mix.

Bell (Peak) Filter

Boosts or cuts a specific frequency range.
The most common EQ tool.

Shelf Filters

Boost or cut everything above or below a certain frequency.


Q Factor – How Wide Is the Change?

The Q factor controls how narrow or wide an EQ adjustment is.

  • Narrow Q – precise problem solving

  • Wide Q – gentle tonal shaping

Use narrow cuts to remove resonances and wide moves for musical shaping.


EQ in Practice: Common Applications

Vocals

  • High-pass to remove low-end rumble

  • Cut low mids to reduce muddiness

  • Gentle boost in high mids for clarity

Drums

  • Kick: boost low end, cut boxy mids

  • Snare: presence boost around mids

  • Hi-hats: remove unnecessary low frequencies

Bass

  • Shape low end to sit with the kick

  • Cut muddy frequencies

  • Control upper mids for definition


Static EQ vs. Dynamic EQ

  • Static EQ applies constant boosts or cuts

  • Dynamic EQ reacts only when frequencies become too loud

Dynamic EQ is ideal for:

  • Harsh vocals

  • Resonant instruments

  • Problem frequencies that change over time


EQ and Mixing Philosophy

EQ is not about making every track sound “good” on its own—it’s about making everything work together.

Sometimes a sound that seems thin soloed fits perfectly in the mix. Always EQ while listening in context.


Common EQ Mistakes

– Over-boosting high frequencies
– Soloing tracks too much
– Using extreme EQ moves unnecessarily
– Ignoring gain staging
– EQing visually instead of by ear

Trust your ears, not just the graph.


A Simple EQ Workflow

  1. Listen to the sound in the mix

  2. Identify problems, not preferences

  3. Apply gentle cuts

  4. Boost only if needed

  5. A/B test often

  6. Stop when it sounds better, not brighter


EQ is one of the most powerful creative tools in music production. When used intentionally, it creates space, clarity, and balance. When overused, it causes fatigue and imbalance.

Learn the frequency spectrum, train your ears, and use EQ with purpose. Great mixes aren’t about more EQ—they’re about better decisions.

The Role of Compression in a Mix and How to Use a Compressor Intentionally

Compression is one of the most powerful—and most misunderstood—tools in music production. Used well, it brings clarity, consistency, and energy to a mix. Used poorly, it can flatten dynamics, kill emotion, and make tracks sound lifeless.

In this article, we’ll explore the role of compression in a mix and explain how to use a compressor consciously, with intention rather than habit.


What Is Compression?

A compressor reduces the dynamic range of a signal—the difference between the loudest and quietest parts.

In simple terms:

  • Loud sounds get quieter

  • Quiet sounds become more audible (after makeup gain)

The goal is not just loudness, but control and balance.


Why Compression Matters in a Mix

Compression helps a mix by:

  • Controlling uneven performances

  • Making tracks sit better together

  • Enhancing punch and sustain

  • Improving clarity and intelligibility

  • Adding character and energy

However, compression should always serve a purpose—not be applied automatically.


Key Compressor Parameters Explained

Understanding the main controls is essential for intentional use.

Threshold

Determines the level at which compression starts.

  • Lower threshold = more compression

Ratio

Controls how strongly the signal is compressed.

  • 2:1 – gentle control

  • 4:1 – standard mix compression

  • 8:1+ – aggressive or limiting

Attack

How quickly the compressor reacts.

  • Fast attack → tames transients

  • Slow attack → preserves punch

Release

How quickly compression stops.

  • Fast release → energetic, sometimes aggressive

  • Slow release → smooth and natural

Makeup Gain

Raises the output level after compression.


Compression as Dynamic Control

The most common use of compression is evening out performance dynamics.

Examples:

  • Vocals with inconsistent volume

  • Bass guitar with uneven notes

  • Acoustic instruments with strong transients

Here, the compressor acts like an automatic fader, maintaining a stable level without constant automation.


Compression for Punch and Energy

Compression can also enhance transients and groove.

  • Slow attack + medium release → punchy drums

  • Parallel compression → thicker, more energetic sound

  • Bus compression → cohesive drum or instrument groups

This type of compression is about feel, not just control.


Tone and Color: Creative Compression

Some compressors are valued for their sound character, not just functionality.

  • Optical compressors → smooth and musical

  • FET compressors → aggressive and fast

  • VCA compressors → clean and precise

Using compression for tone means listening carefully and choosing tools intentionally.


Common Compression Mistakes

– Over-compressing everything
– Using presets without listening
– Too fast attack on drums (kills punch)
– Ignoring release timing
– Compressing when automation would work better

Compression should solve a problem—not create one.


When NOT to Use Compression

Not every track needs compression.

Avoid compression when:

  • The performance already sounds balanced

  • Dynamics are musically important

  • You’re compressing “just in case”

Sometimes, the best compressor setting is bypass.


Compression vs. Automation

Compression and volume automation serve different purposes:

  • Compression controls micro-dynamics

  • Automation shapes macro-dynamics

The best mixes often use both, intentionally and subtly.


How to Use a Compressor Consciously (Step-by-Step)

  1. Ask: What problem am I solving?

  2. Start with gentle settings

  3. Adjust attack and release while listening

  4. Match output level (avoid loudness bias)

  5. Bypass often to compare

  6. Stop when it sounds better—not louder


Compression is not about making everything louder or flatter—it’s about control, balance, and musical intention. When you understand what a compressor is doing and why you’re using it, your mixes become clearer, punchier, and more emotional.

Learn to listen. Trust your ears. Use compression with purpose.

How Synthesizers Work – A Beginner’s Introduction

Synthesizers are at the heart of modern music production. From classic analog sounds to cutting-edge electronic textures, synths are used in almost every genre—from pop and EDM to film scores and experimental music. But how do synthesizers actually work?

In this beginner-friendly guide, we’ll break down the core concepts behind synthesizers in a simple and practical way.


What Is a Synthesizer?

A synthesizer is an instrument that generates and shapes sound electronically. Instead of producing sound through vibrating strings or air columns, synths create sound using oscillators, filters, and modulators.

At their core, synthesizers allow you to:

  • Create sounds from scratch

  • Shape tone and timbre

  • Control sound over time

  • Experiment creatively with audio


The Basic Signal Path

Most synthesizers—hardware or software—follow a similar structure called the signal path:

Oscillator → Filter → Amplifier → Output

Understanding this flow makes learning synthesis much easier.


1. Oscillators – The Sound Source

The oscillator generates the raw sound. It creates a continuous waveform at a specific pitch.

Common Waveforms

  • Sine – smooth and pure

  • Square – hollow and aggressive

  • Sawtooth – bright and rich

  • Triangle – soft but harmonically complex

Each waveform has a unique harmonic structure, which affects how the sound feels and cuts through a mix.


2. Pitch and Frequency

Pitch is controlled by frequency, measured in Hertz (Hz).

  • Low frequencies = bass sounds

  • High frequencies = bright, sharp sounds

When you play different notes on a keyboard or MIDI controller, you’re changing the oscillator’s frequency.


3. Filters – Shaping the Tone

Filters shape the sound by removing certain frequencies.

Common Filter Types

  • Low-pass filter (LPF) – removes high frequencies

  • High-pass filter (HPF) – removes low frequencies

  • Band-pass filter (BPF) – allows a specific frequency range

The most important filter controls:

  • Cutoff – where frequencies start to be reduced

  • Resonance – boosts frequencies around the cutoff point

Filters are key to creating movement and character in synth sounds.


4. Amplifier and Volume Control

The amplifier (amp) controls the loudness of the sound.

Most synths use an envelope to shape volume over time, known as ADSR:

  • Attack – how quickly the sound starts

  • Decay – how fast it drops after the attack

  • Sustain – the level while holding the note

  • Release – how long it fades after releasing the key

ADSR envelopes help create everything from sharp plucks to long evolving pads.


5. Envelopes – Adding Expression

Envelopes aren’t limited to volume. They can also control:

  • Filter cutoff

  • Pitch

  • Modulation depth

This is how synth sounds feel expressive instead of static.


6. LFOs – Movement and Modulation

An LFO (Low-Frequency Oscillator) modulates parameters over time.

Common LFO targets:

  • Pitch (vibrato)

  • Filter cutoff (wobble)

  • Volume (tremolo)

  • Panning

LFOs add rhythm and motion to sounds, making them feel alive.


7. Mono vs. Poly Synths

  • Monophonic synths – play one note at a time (great for bass and leads)

  • Polyphonic synths – play multiple notes at once (pads, chords)

Modern software synths usually support both modes.


8. Analog vs. Digital Synthesizers

Analog Synths

  • Use electrical circuits

  • Warm, unpredictable character

  • Classic sound

Digital Synths

  • Software or digital hardware

  • Extremely flexible

  • Stable and affordable

Many modern synths combine both approaches.


9. Subtractive Synthesis (The Most Common Type)

Most beginner synths use subtractive synthesis:

  1. Generate a harmonically rich waveform

  2. Remove frequencies with filters

  3. Shape dynamics with envelopes

This method is the foundation of countless iconic sounds.


Why Learn Synthesizers?

Understanding synthesis helps you:

  • Create your own unique sounds

  • Modify presets with confidence

  • Work faster and more creatively

  • Improve sound design skills

Once you understand the basics, presets stop feeling like magic—and start feeling like tools.


Synthesizers may seem complex at first, but they all rely on the same core principles. By understanding oscillators, filters, envelopes, and modulation, you unlock a powerful world of sound design.

Start simple. Turn one knob at a time. Experiment freely.
The best way to learn synthesis is by listening and exploring.

Steinberg The Grand 3 – A Classic Concert Piano VSTi

When it comes to realistic piano virtual instruments, Steinberg’s The Grand 3 has long been considered a classic. Designed for composers, producers, and performers who need an authentic grand piano sound inside their DAW, this VSTi focuses on realism, dynamics, and expressive control rather than flashy extras.

In this article, we take a closer look at what The Grand 3 offers, how it sounds, and who it’s best suited for.


What Is Steinberg The Grand 3?

The Grand 3 is a virtual instrument (VSTi) developed by Steinberg, the creators of Cubase and Nuendo. It is a deeply sampled piano library that recreates multiple concert grand pianos with a strong emphasis on natural tone and playability.

Unlike many modern piano plugins that rely on hybrid modeling, The Grand 3 is primarily sample-based, using detailed recordings of real acoustic grand pianos.


Included Piano Models

The plugin includes five distinct piano instruments, each with its own character:

  • Yamaha C7 – bright, clear, and modern

  • Steinway D – warm, rich, and orchestral

  • Bösendorfer 290 – deep, powerful low end

  • Nordiska Upright – intimate and characterful

  • Electric Piano – a classic EP-style sound

This variety makes The Grand 3 suitable for many genres, from classical and jazz to film scoring and pop production.


Sound Quality and Realism

The strength of The Grand 3 lies in its dynamic response and natural decay. Velocity layers are well balanced, allowing soft passages and aggressive playing to feel expressive and musical.

Key sonic features include:

  • Detailed velocity sampling

  • Natural sustain and release behavior

  • Realistic pedal response

  • Smooth transitions across the keyboard

The result is a piano that feels organic and playable, especially when used with a weighted MIDI keyboard.


Interface and Controls

The interface of The Grand 3 is clean and functional, focusing on essential piano-related controls rather than complex sound design.

Main parameters include:

  • Microphone position and stereo width

  • Lid position

  • Pedal noise and key noise

  • EQ and basic tonal shaping

  • Velocity response curves

While the interface may look slightly dated compared to newer plugins, it remains intuitive and efficient.


Performance and System Requirements

Because The Grand 3 uses large sample libraries, it requires:

  • Sufficient disk space

  • A reasonably fast SSD (recommended)

  • Adequate RAM for smooth performance

Once properly set up, performance is stable, especially inside Cubase, where integration is seamless. It also works well in other DAWs that support VSTi plugins.


Best Use Cases

The Grand 3 works best in situations where realism and authenticity matter most:

  • Classical piano compositions

  • Film and game scoring

  • Jazz and solo piano recordings

  • Pop and ballad productions

  • Studio recording and MIDI performances

It is less suitable for experimental sound design or heavily processed piano effects, as its focus is realism.


Pros and Cons

Pros

  • High-quality, realistic piano sounds

  • Multiple grand piano models included

  • Excellent dynamic response

  • Trusted Steinberg quality

  • Strong integration with Cubase

Cons

  • Large library size

  • Interface feels dated

  • Limited sound-design capabilities

  • Not the newest piano engine on the market


How Does It Compare to Modern Piano Plugins?

Compared to newer libraries like Keyscape or Pianoteq, The Grand 3 may lack advanced modeling or ultra-modern UI design. However, it still holds its own thanks to its musical tone and reliability.

Producers who value consistency, realism, and simplicity often continue to use The Grand 3 alongside newer instruments.


Steinberg The Grand 3 remains a solid choice for producers and composers who need a dependable, realistic piano VSTi. While it may not be the most cutting-edge virtual piano available today, its sound quality and expressive playability still make it relevant—especially for users within the Steinberg ecosystem.

If your goal is a natural-sounding concert piano that sits well in mixes and responds beautifully to performance, The Grand 3 is well worth considering.

Sound Theory Basics: What Every Music Producer Should Know

Understanding sound is the foundation of music production. You don’t need to be a physicist or audio engineer, but knowing how sound works will help you make better creative decisions, improve your mixes, and communicate more effectively with other producers.

In this article, we’ll cover the essential sound theory concepts that every music producer—beginner or intermediate—should understand.


1. What Is Sound?

At its core, sound is vibration. When an object vibrates, it creates waves that travel through the air (or another medium) and reach our ears. Our brains interpret these vibrations as sound.

In music production, sound is represented digitally as an audio signal, but it still follows the same physical principles.


2. Frequency – Pitch Explained

Frequency refers to how fast a sound wave vibrates and is measured in Hertz (Hz).

  • Low frequencies = low-pitched sounds (bass, kick drum)

  • High frequencies = high-pitched sounds (hi-hats, cymbals, air)

Human Hearing Range

  • Approx. 20 Hz – 20,000 Hz

  • Most musical content lives between 40 Hz – 15 kHz

Understanding frequency helps you:

  • Use EQ effectively

  • Avoid muddy mixes

  • Know where instruments sit in the spectrum


3. Amplitude – Loudness and Volume

Amplitude describes the strength of a sound wave and is perceived as loudness.

In digital audio, loudness is measured in:

  • dB (decibels)

  • dBFS (decibels relative to full scale)

Key concepts:

  • Louder is not always better

  • Proper gain staging prevents distortion

  • Headroom is essential for clean mixes

Managing amplitude correctly is the foundation of good mixing.


4. Waveforms – The Shape of Sound

A waveform is the visual representation of sound over time.

Common waveform types:

  • Sine wave – smooth, pure tone (no harmonics)

  • Square wave – aggressive, rich in harmonics

  • Sawtooth wave – bright and full (common in synths)

  • Triangle wave – softer but harmonically rich

Knowing waveform shapes helps you:

  • Design better synth sounds

  • Understand timbre and tone

  • Choose the right sound for the right role


5. Harmonics and Timbre

Two sounds can play the same note but still sound different. Why?

The answer is harmonics.

  • Fundamental frequency = the main pitch

  • Harmonics (overtones) = additional frequencies above it

The combination of harmonics creates timbre, which is the character or color of a sound.

Example:

  • A piano and a guitar playing the same note sound different because of their harmonic content.


6. Phase – A Hidden Mixing Problem

Phase describes the timing relationship between sound waves.

When sounds are:

  • In phase → louder, fuller sound

  • Out of phase → weaker sound or cancellation

Phase issues often occur when:

  • Recording with multiple microphones

  • Layering similar sounds

  • Using stereo effects

Understanding phase helps you avoid thin mixes and unexpected loss of low end.


7. Time-Based Properties of Sound

Sound exists over time, not just frequency.

Important time-related concepts:

  • Attack – how quickly a sound reaches full volume

  • Decay – how fast it fades after the attack

  • Sustain – how long it stays loud

  • Release – how long it takes to fade out

These are commonly referred to as ADSR, especially in synthesizers and compressors.


8. Digital Audio Basics

Modern music production is digital, so these terms matter:

  • Sample rate – how often audio is captured per second (e.g. 44.1 kHz)

  • Bit depth – how detailed each sample is (e.g. 24-bit)

  • Clipping – distortion caused by exceeding digital limits

Higher values generally mean better quality—but also higher CPU and storage usage.


9. Why Sound Theory Matters for Producers

Understanding sound theory helps you:

  • EQ with intention, not guesswork

  • Choose sounds that work well together

  • Avoid technical problems early

  • Work faster and more confidently

  • Translate your music better across systems

It turns random knob-turning into purposeful production.


Sound theory doesn’t kill creativity—it supports it. The more you understand how sound behaves, the easier it becomes to shape it into something musical, emotional, and powerful.

You don’t need to learn everything at once. Start with frequency, loudness, and waveforms—and build from there. Every great producer, whether they realize it or not, relies on these fundamentals.

The Best Free DAWs – Comparison and Recommendations

Getting started with music production doesn’t have to cost a fortune. Whether you’re a beginner exploring your first sounds or a seasoned creator experimenting with new workflows, there’s a free Digital Audio Workstation (DAW) for you. In this guide, we’ll compare the best free DAWs available today and help you choose the one that suits your needs.


What Is a DAW?

A Digital Audio Workstation (DAW) is the central software where you compose, record, edit, arrange, and mix your music. It’s the core of your production process, and the right DAW can make learning faster and more fun.

Free DAWs may have limitations compared to premium versions, but they are fully capable of professional-sounding results—especially when combined with third-party plugins and virtual instruments.


Why Use a Free DAW?

Starting with a free DAW lets you:

  • Learn music production without financial risk

  • Understand core tools and techniques

  • Experiment with different workflows

  • Decide what features matter most before upgrading


Top Free DAWs Compared

Here are some of the best free DAWs currently available, along with their strengths and ideal users.


1. Cakewalk by BandLab

Best for: Windows users looking for a full professional DAW
Platform: Windows
Why it’s great:

  • Fully featured, modern DAW

  • Unlimited tracks and plugins

  • Professional-grade mixing tools

  • Supports VST3 plugins

Cakewalk by BandLab is often considered the most powerful free DAW available. Originally a premium product, Cakewalk now offers advanced editing, mixing, automation, and routing—everything you need to create complete songs. It’s ideal if you want a serious, long-term production environment without paying.


2. GarageBand

Best for: Mac and iOS users, beginners
Platform: macOS, iOS
Why it’s great:

  • Very intuitive interface

  • High-quality built-in instruments and loops

  • Great for songwriting and beat making

  • Easy to upgrade to Logic Pro later

GarageBand is Apple’s free DAW and one of the most beginner-friendly options. The workflow is approachable, the library of sounds is excellent, and it’s perfect for music creators who are new to DAWs. If you already have a Mac or iPad, it’s an easy first step into production.


3. Tracktion Waveform Free

Best for: Creative producers who like flexible workflows
Platform: Windows, macOS, Linux
Why it’s great:

  • Unlimited audio/MIDI tracks

  • Modern, uncluttered design

  • Good plugin support

  • Creative modulation tools

Waveform Free from Tracktion offers a creative and flexible environment. It may feel unfamiliar at first, but its modular approach lets you shape sounds in unique ways. It’s a strong choice for electronic music producers and anyone who wants more experimental tools.


4. Audacity

Best for: Simple recording, editing, and podcast production
Platform: Windows, macOS, Linux
Why it’s great:

  • Lightweight and easy to use

  • Great for editing audio clips

  • Many free plugins available

  • Very low system requirements

Audacity is one of the most well-known free audio editors/DAWs. While it’s not designed for deep MIDI production or large multitrack mixes, it excels at recording, cutting, and cleaning up audio. It’s also widely used for podcasts and simple music projects.


5. LMMS (Linux MultiMedia Studio)

Best for: Beat makers and electronic producers
Platform: Windows, macOS, Linux
Why it’s great:

  • Pattern-based workflow similar to FL Studio

  • Built-in instruments and synths

  • Ideal for loops and electronic music

  • Supports VST plugins (with bridge)

LMMS is a great choice if you’re focused on composing beats and electronic tracks. The pattern-based workflow lets you build arrangements quickly, and it comes with a solid collection of synths and samples to get started.


6. Ohm Studio (Free Version)

Best for: Online collaboration
Platform: Windows, macOS
Why it’s great:

  • Real-time online collaboration with others

  • Built-in instruments and effects

  • Simple interface

Ohm Studio stands out for its collaborative features. If you like working with other musicians online, this DAW makes it easy to share projects and work together in real time.


How to Choose the Right Free DAW

Here are some tips to help you decide:

  • Are you a total beginner? → Try GarageBand or Audacity

  • Do you want pro features?Cakewalk by BandLab is the most fully featured

  • Do you make electronic music?LMMS or Waveform Free

  • Do you want to collaborate online?Ohm Studio

  • Are you on Linux?LMMS or Waveform Free

Also consider:

  • Your operating system

  • Your musical goals

  • Whether you plan to expand into paid tools later


Cakewalk by BandLab

  • Platform: Windows
  • Unlimited Tracks: ✔️
  • MIDI Support: ✔️
  • Audio Recording: ✔️
  • Built-In Instruments: ✔️
  • Plugin Support: VST3

Download

GarageBand

  • Platform: macOS, iOS
  • Unlimited Tracks: ✔️
  • MIDI Support: ✔️
  • Audio Recording: ✔️
  • Built-In Instruments: High quality
  • Plugin Support: Limited AU

Download

Tracktion Waveform Free

  • Platform: Windows, macOS, Linux
  • Unlimited Tracks: ✔️
  • MIDI Support: ✔️
  • Audio Recording: ✔️
  • Built-In Instruments: ✔️
  • Plugin Support: VST/AU

Download

Audacity

  • Platform: Windows, macOS, Linux
  • Unlimited Tracks: ✔️
  • MIDI Support: ❌ (limited)
  • Audio Recording: ✔️
  • Built-In Instruments:
  • Plugin Support: Via plugins

Download

LMMS

  • Platform: Windows, macOS, Linux
  • Unlimited Tracks: ✔️
  • MIDI Support: ✔️
  • Audio Recording:
  • Built-In Instruments: ✔️
  • Plugin Support: VST (with bridge)

Download

Ohm Studio (Free)

  • Platform: Windows, macOS
  • Unlimited Tracks: ✔️
  • MIDI Support: ✔️
  • Audio Recording: ✔️
  • Built-In Instruments: ✔️
  • Plugin Support: ✔️

Download

Tips for Getting Started

Once you’ve chosen a DAW:

  1. Learn the basics: Watch beginner tutorials for your specific software

  2. Explore built-in sounds: Try loops and virtual instruments

  3. Experiment with plugins: Add free synths and effects

  4. Finish small projects: Practice by completing short tracks

  5. Ask for feedback: Share your music with online communities


Free DAWs have come a long way. You don’t need to spend money to start producing music—that’s the beauty of modern tools. Whether you want simple recording, beat making, or full song production, there’s a free DAW out there that fits your workflow.

Pick one, start creating, and most importantly—have fun!

Previous Next
Flag Counter